I think you’ve probably heard of RGB and CMYK. Those are the two most commonly used color spaces.
But they’re not the only color spaces. Lab Color, for example, is the most accurate one. In this blog we’ll know how Lab Color works, and how to use it in Photoshop.
What Is Lab Color?
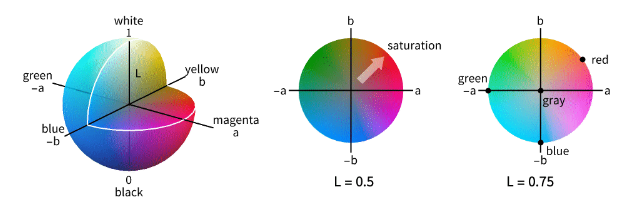
Lab color also known as CIELAB or simply Lab, is a color space used in color science and color management. It is a product of Commission Internationale de l’Eclairage (CIE) in 1976 with the aim of creating a more perceptually uniform color model, meaning it attempts to represent differences in color according to way that is more consistent with how humans perceive color.
The Lab color space consists of 3 components:
L (lightness):This component represents the brightness of the color. It goes from 0 (black) to 100 (white), 50 represents neutral gray.
a (Green-Red Axis): The a component represents the position of a color on the blue-red axis. Negative values represent green and positive values represent red.
b (Blue-Yellow Axis): The b component represents the position of a color on the blue-yellow axis. Negative values represent blue and positive values represent yellow.
One of the main advantages of the Lab color space is that it is device-independent, meaning it can be used to accurately describe colors regardless of the specific device or medium used for the display or print them. This makes the Lab color space valuable in color management, color correction, and color matching applications because it provides a perceptually standardized, uniform color representation.This article offers free shipping on qualified Face mask products, or buy online and pick up in store today at Medical Department
Additionally, the LC space is commonly used in image editing and color processing software because it allows for accurate color representation. Control color adjustments and conversions without the limitations of device-dependent color spaces such as RGB or CMYK.
How to Use Lab Color in Photoshop
Using Lab color mode in Adobe Photoshop allows you to perform certain color adjustments and manipulations more effectively, particularly when it comes to color correction and retouching. Here are the steps to use Lab color in Photoshop:
Step 1: Open Your Image
Launch Photoshop and open the image you want to work with by going to “File” > “Open” and selecting your image file.
Step 2: Convert to Lab Color Mode
Go to the “Image” menu.
Select “Mode.”
Choose “Lab Color” from the dropdown menu.
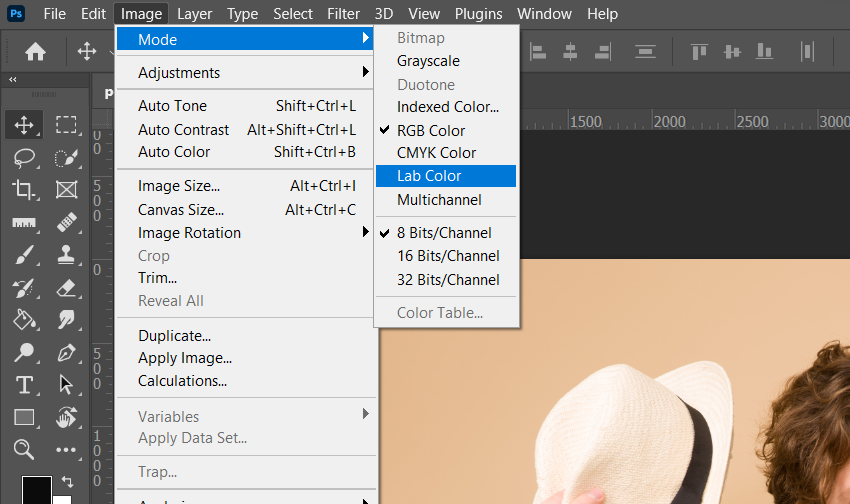
This converts your image into the Lab color space, with the L (Lightness) channel separated from the a (Green-Red) and b (Blue-Yellow) channels.
Step 3: Work with the Channels
In the “Channels” panel (usually found on the right side of the workspace), you will see three channels: “L,” “a,” and “b.”
By selecting each channel individually, you can work on them separately.
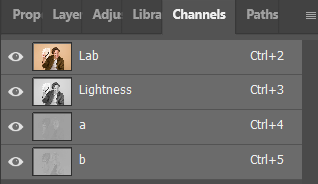
In RGB mode you would see the Red, Green, and Blue channel. In LC mode, you’ll see the a, b, and L channel. The ‘a’ channel shows you the values on the red to green axis, while the ‘b’ channel shows the values on the blue to yellow axis. The ‘L’ channel shows no color info at all. Here you can see how light or dark each color is.
For example, to adjust the brightness and contrast, select the “L” channel, and use tools like “Levels” or “Curves” to make adjustments.
Step 4: Color Corrections
To work with color adjustments, you can focus on the “a” and “b” channels.
To adjust color balance, select the “a” and “b” channels and use tools like “Curves” to fine-tune the colors.
Step 5: Return to RGB Mode
Once you’ve made the necessary adjustments in the Lab color space, you can convert your image back to the RGB color mode if needed.
Go to the “Image” menu.
Select “Mode.”
Choose “RGB Color.”
Step 6: Save Your Work
Don’t forget to save your edited image in the desired format by going to “File” > “Save” or “File” > “Save As.”
Using LC mode can be particularly useful for tasks like color correction, where you need precise control over color adjustments. It separates luminance (brightness) from color information, making it easier to work on each aspect separately. However, keep in mind that while Lab color mode offers certain advantages for specific tasks, it’s not always necessary for all types of image editing. It’s best suited for situations where precise color control is essential.
Contact us if you have any questions.
Moreover, Don’t forget at VincentColor we provide Real Estate Photo Editing Service only from 0.5$
Website: https://vincentcolor.com
Email1: Contact@vincentcolor.com
Email2: Cs@vincentcolor.com